As part of Tainacan’s fundamental task of enabling the management and exposition of digital collections, is the task of providing the configuration of different forms of structured data. This mission has been fulfilled by the so-called “metadata types”, which in the plugin are the way in which information about an item is created. To face the diversity of information that can be represented, we have used metadata types such as Text (simple and long), Numeric, Date, Relationship, Taxonomy, User and Compound.
This set of information types is about to get another member, one that should help us show something very relevant to several areas: geographic localization. This introduces a lot of new interfaces and concepts for Tainacan, so come with us:
What’s new
Geolocation Metadata
Setting up the metadatum
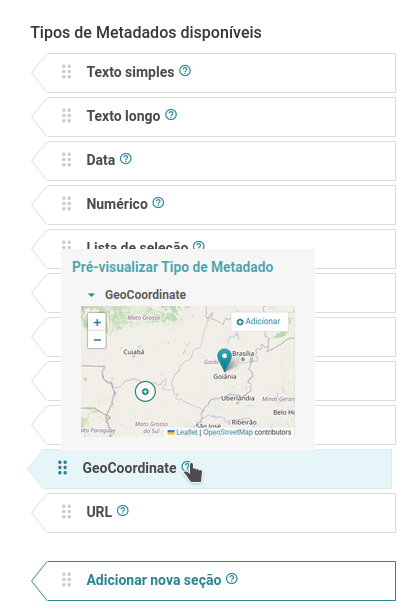
At first, the Geolocation module will feel non-existent to Tainacan users. This is because to use it, you need your collection, or repository, to have some location metadata. To do this, you need to go to the metadata settings page and create some metadata of this type, which will be in the list of available metadata (see picture to the right).
The metadata will have all the settings usually found in Tainacan metadata. You can change, for example, its name to something like “Location”. There is an option to display the metadata by default in the listings, which will be important later on when we talk about the visualization mode. In addition, you can set it so that multiple values are allowed. In this case, more than one flag can be set for the same metadata in the same item.
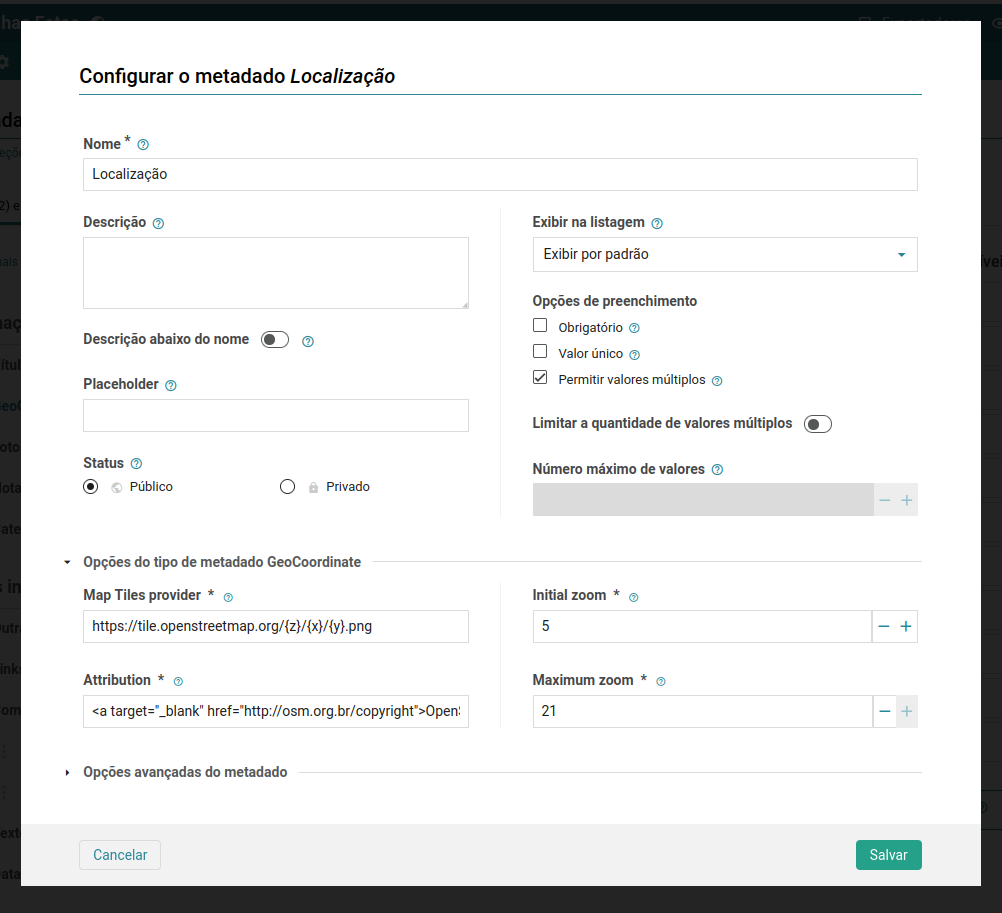
Mas há aqui também as configurações específicas do metadado de Geolocalização. Elas são 4:
- The map image provider: which by default is already filled in with the recommended OpenStreetMaps address;
- The attribution: the proper credits for the use of the map image server, in this case also with the recommended address for using OpenStreetMaps;
- The initial map zoom: so that if the user wishes to start with the map closer or further away he can change this value, which goes from 0 to 21;
- The maximum map zoom: which analogously determines how close you can get to the map, with a value from 0 to 21.
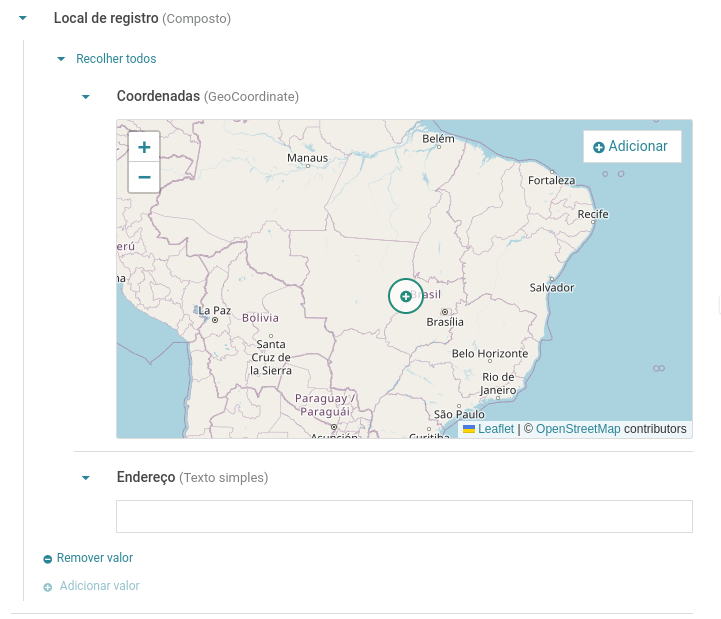
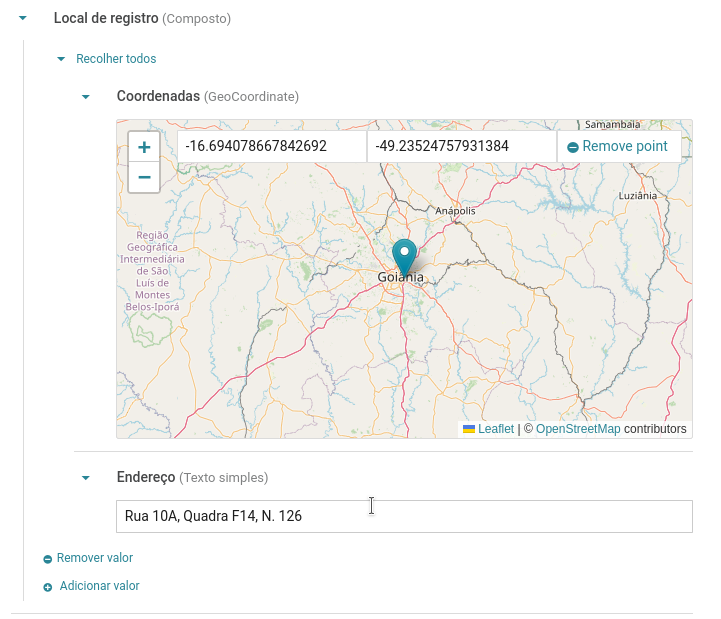
With the proper setup, it will already be possible to determine the location in items. We will, however, create a second Geolocation metadata here, to demonstrate its special function within the Compound metadata.
Compound metadata is a way of representing information that has a strong link to each other, so that it does not make sense to create fields for it without using more than one type of metadata. The Geolocation metadata is a good use of this, since it will itself store only the coordinates (latitude and longitude), but possibly there is other information that is of interest about the point, such as its address. Below is an example of a compound metadatum set up with two “child” metadata, a text metadata that stores the address and a Geolocation metadata:

Note that in this particular situation, it is not possible to configure the Geolocation metadata to accept multiple values, since the one that may be multi-valued is the composite metadata where it is located.
Setting Locations in Items
With the metadata created, you can edit or create any item to look at the newly available input fields, which load dedicated maps for each Geolocation metadata.
In the image above is the metadata created within the previously mentioned composite. There are two ways to add markup:
- By just moving the cycle and then clicking the add button in the upper right field.
- By clicking on the map directly, or by moving the blue cycle and then clicking, the point will be inserted;
You can use the zoom controls to zoom in and out of the map, and even the mouse scroll. With a point marked, you can see the latitude and longitude information set:
Finally, you can click and drag the marker itself to define a new location. Since in this case the metadata is inside a composite, you can create new locations by clicking on “Add Value”. For the metadata outside the previously created composite, you can insert several points on the same map:
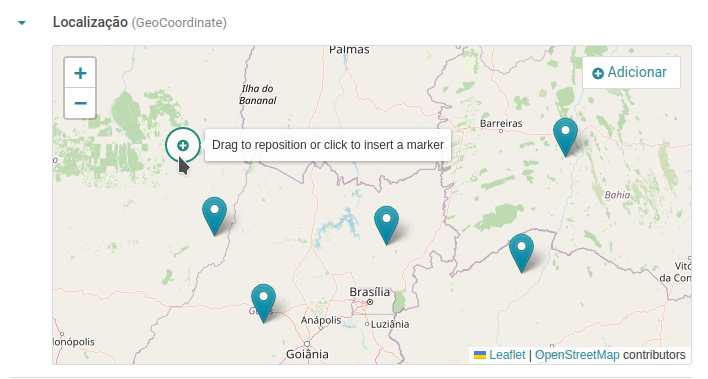
A single click on the map positions the addition circle, and a consecutive click on the circle creates a new point. By clicking on one of the existing points, the coordinate editing interface reappears, and the selected point is focused, centered and has a higher opacity than the others:
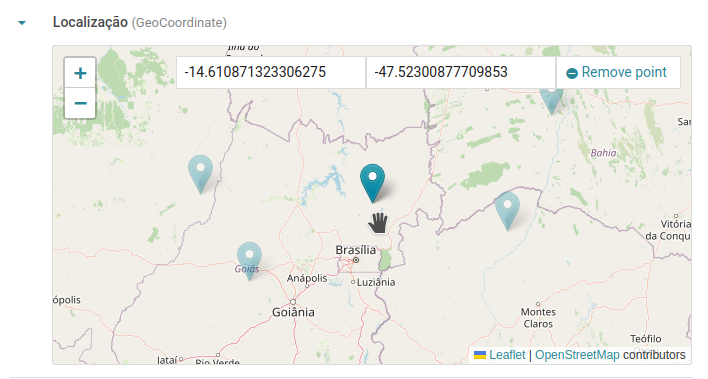
As can be seen in the image above, when clicking on a point it can also be removed using the button in the upper right corner.
Viewing the configured locations.
When accessing the public page of the configured item on the site, each metadata will have the map loaded with the points indicating the configured location:
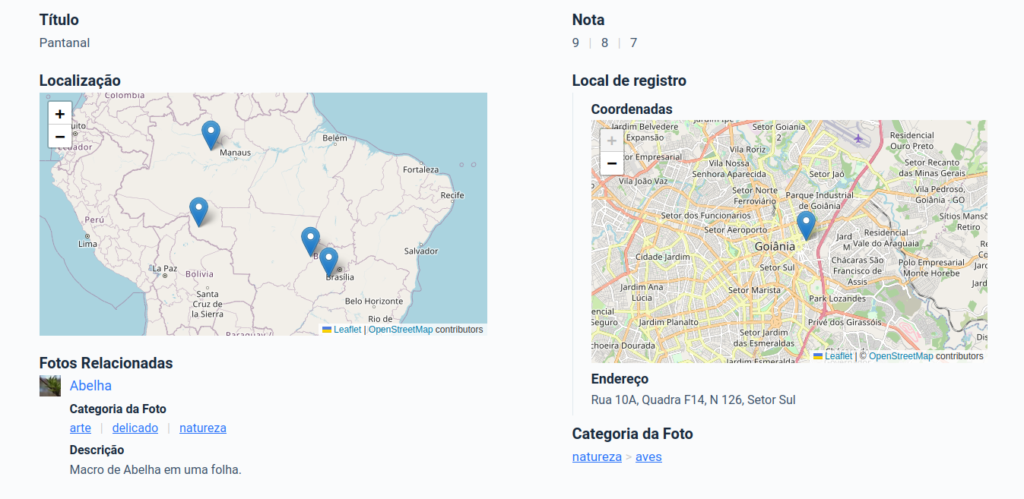
Such behavior, of showing the map loaded for each value, is unique to the public page of the item. On the administrative page and in the item listings, instead of loading multiple maps, the basic information that the metadata holds is shown: the geographic coordinates. For example, in the “Tab” view mode, an item in the item list will appear as follows:
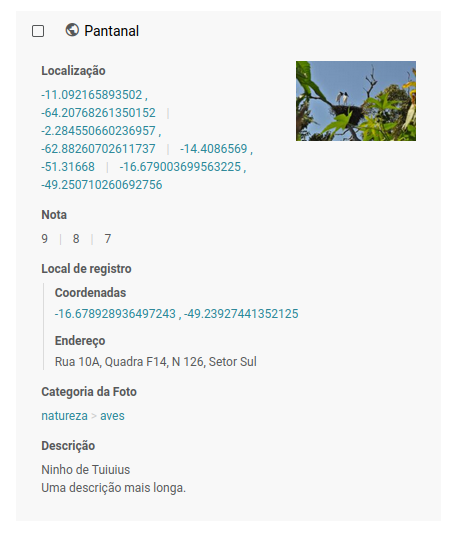
This avoids multiple small maps being loaded in a way that weighs down the page load, and it is also difficult to interact with if you think about some scenarios like the table view mode. But there is one detail: the coordinates here are links assembled using the Geo URI Scheme, which was created to make it possible to open locations in applications set up to load maps. On some systems this may lead to windows that offer traditional map services like Google Maps and Apple Maps.
But the proper way to view locations in an item listing is with just one map that aggregates all the locations of all the items. For this a new view mode has been created, called – Map.
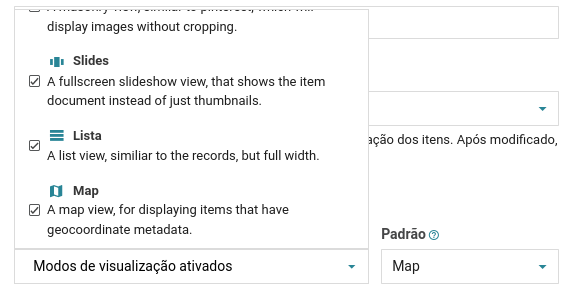
The “Map” View Mode
The map view mode is enabled by default on the administrative side and can be enabled on the public side in the Collection settings:
Accessing a list of items and clicking on the “map” view mode gives you something like:
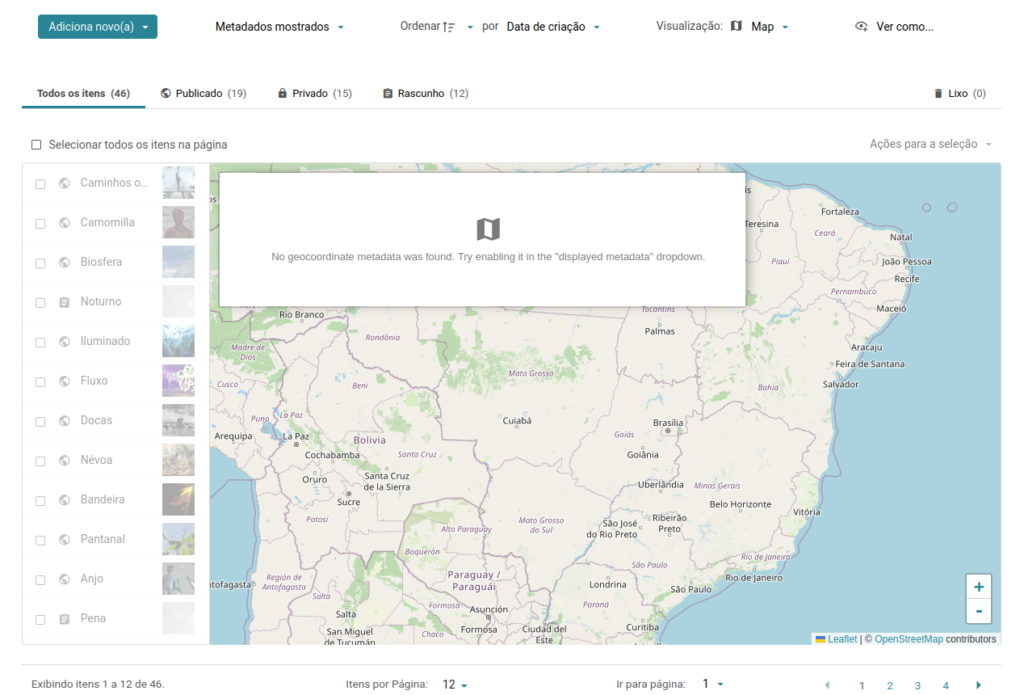
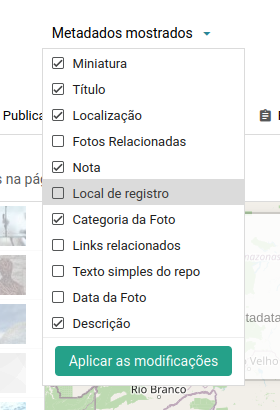
If this panel with the map icon appears over the map, it means that no geolocation metadata has been created or is active. And since this view depends on the existence of some, that it is stressed out. So in the settings of the metadata itself, it is recommended to set it to “Display by default” in the item listings. Otherwise, you will need to go to the “Metadata shown” dropdown in the search control bar and manually enable the existing geolocation metadata.
With this issue adjusted, the map should load by placing markers on the values set in the first of the existing geolocation metadata:
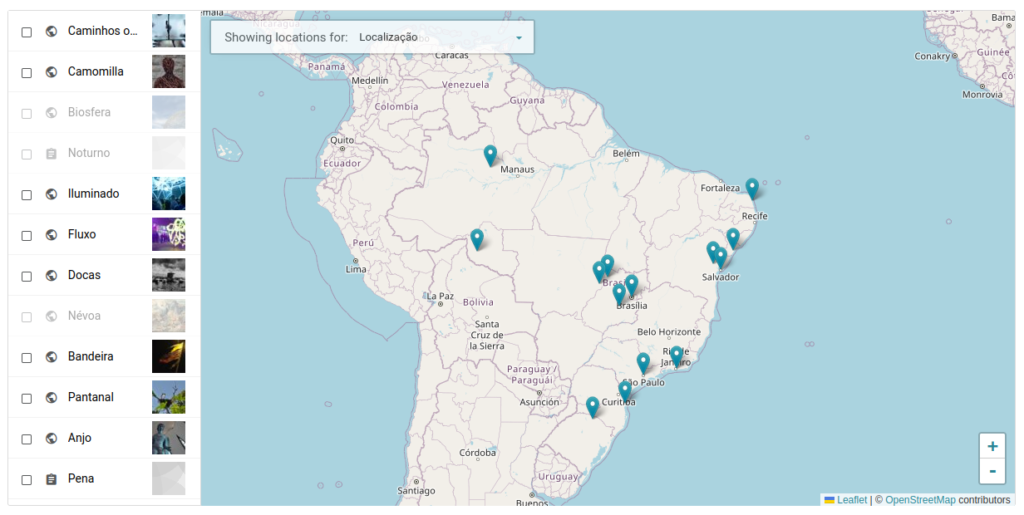
The control in the top bar indicates from which of the geolocation metadata the locations are being pulled of. Next to it is the list of items matching the current search/filters. Note that some items are at low opacity, almost transparent. These are the ones that meet the criteria of the current list (search, sort, and filters), but have no value configured in their geolocation metadata. When clicking on one of these items, a message reinforces this fact. For the items that do have a location, there are two levels of interaction: when the mouse is hovered over them, their markers on the map become larger. When you click on the item, the other markers will lose opacity and a floating panel will open, showing the item’s information:
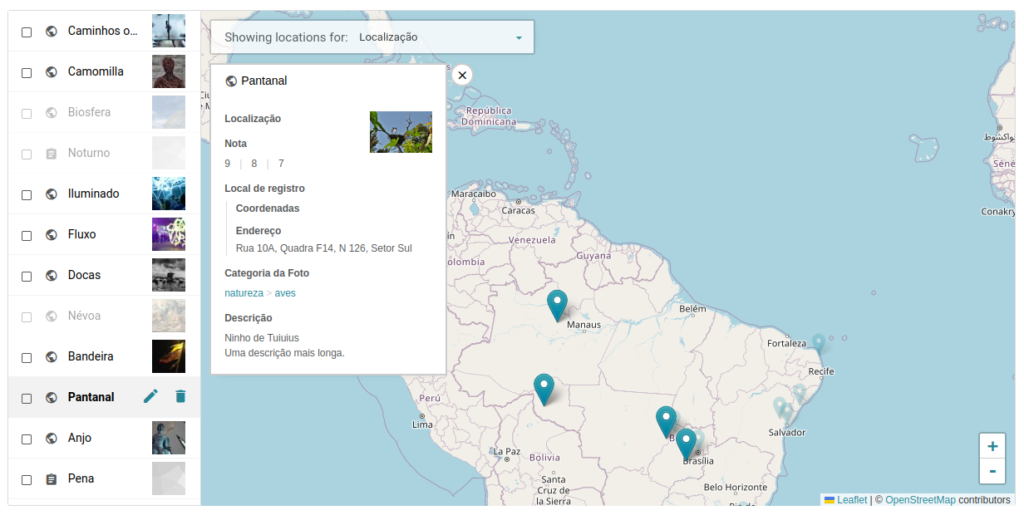
Any click on the item here outside the map will deselect this item. A click on the tab itself, on the other hand, takes you to the item’s page. In the example above, we are looking at an item whose metadata is multi-valued and therefore has more than one location information. Hovering the mouse over the location gives us the name of the item and a quantity indicator:
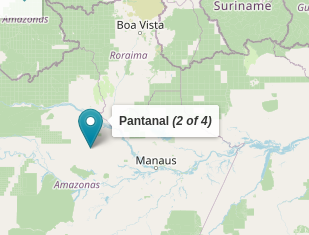
Even with the item deselected we can click on a marker. This will highlight the marker and open the corresponding item’s panel. However, if it is multi-valued, other related locations may be out of view. To center on all the locations for that item, there is a “location” icon on the item tab, which repositions the map:

It is important to note here that the list of items is still paginated. This means that not every item is present, but the set of them that has been loaded on this page. As in any Tainacan view mode, the number of items to be shown per page can be configured below the list.
Finally, there is a special behavior of geolocation metadata that has been inserted within compound metadata. By changing the metadata in the selector in the top left corner of the map, we can mark the one that was previously created. By hovering over any marker in this metadata, we see more information than just the title:
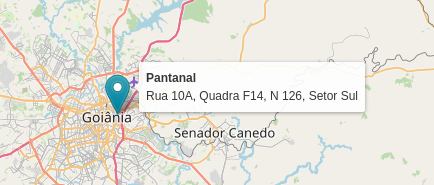
Uniquely for the case of the composite, the other information in the metadata is shown, without including the labels that are usually present in the field. This is the way in which multiple pieces of information from a location are shown in the geolocation metadata.
Conditional Metadata Sections
In version 0.19 we introduced several new features related to metadata sections. Now that everyone is getting used to organizing their long lists of metadata within sections, how about giving them more power? With conditional sections we start allowing a section to appear or not appear depending on the value of a certain metadatum in another section. Here’s how it works:
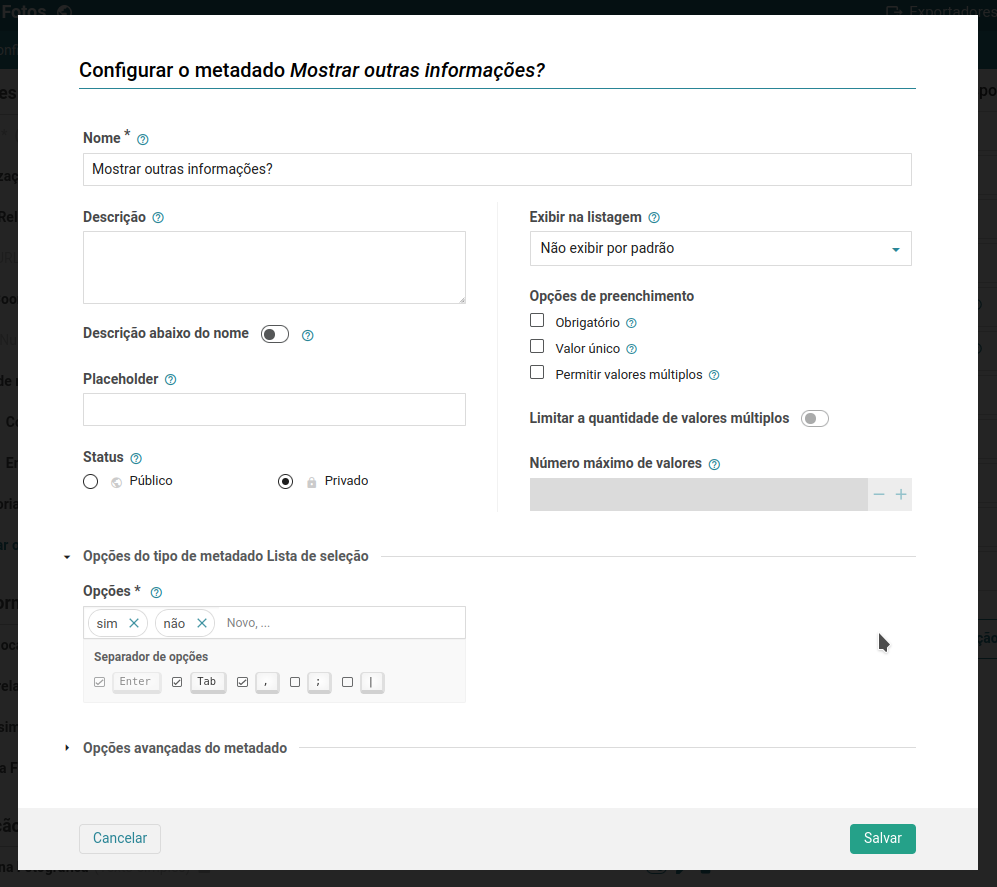
You create, inside a section, a metadata of type “Selectbox”. We setup its options available as “yes” or “no”:
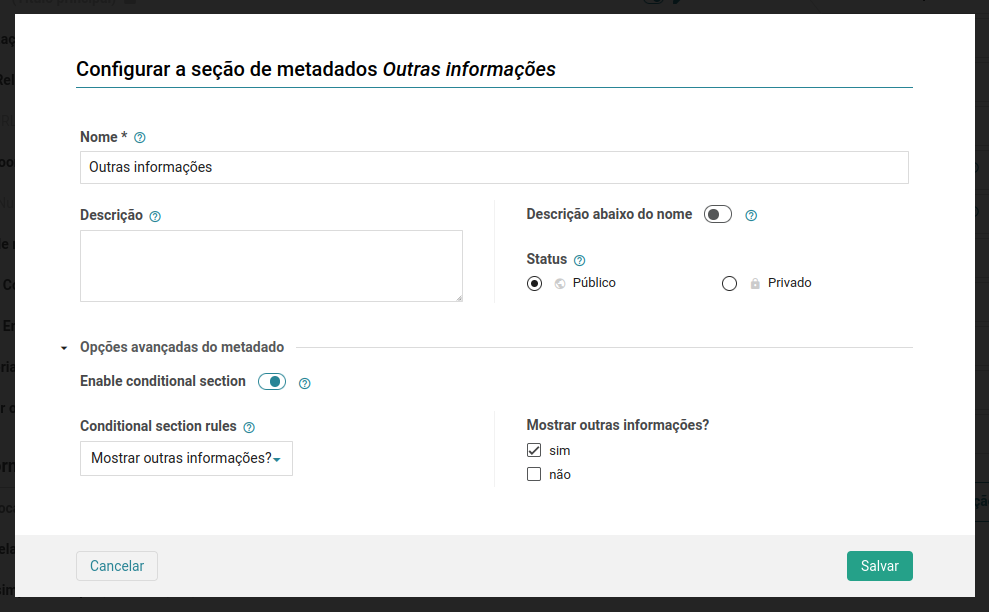
With that done, we can now go into the settings of another metadata section (other than the one where the metadatum was created) and enable the Conditional Section option. With this we configure which metadata and which value will serve as criteria for showing or not showing this section:
Let’s now go to the edit page for an item. The section will appear disabled, as long as the selection metadata does not have the value “yes”:
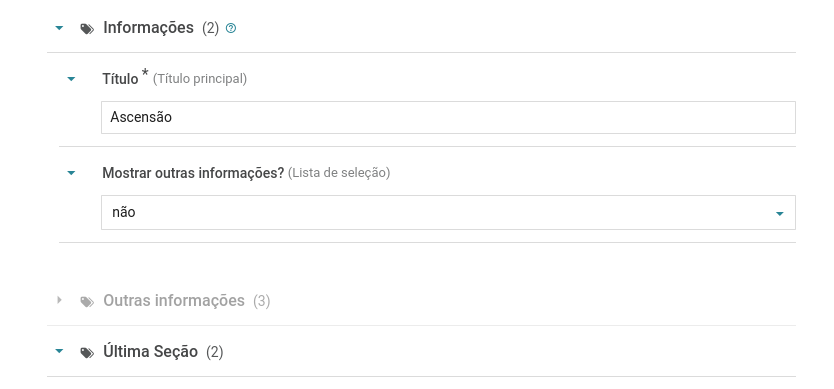
This “disabled” appearance is the behavior on the administrative side. On the public side, such as the item page, this section will not even be displayed. This is a way to put “incremental” information into items, so that not all will have this data, but some, based on some condition, will have extra information.
Sections in the Item Submission Block as “steps“
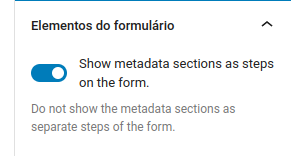
And in addition to the Conditional Sections feature, the Gutenberg block that creates the Item Submission Form just gained a new feature: breaking up the metadata sections into “steps”. For those familiar with Google Forms, this is very similar to the idea of breaking a large form into pages that instead of ending with a “submit” button, have a “next” button:

With this feature, public submission forms can become less tedious and really offer only those questions that are relevant for each situation.
Query Loop Block Variations
For those who have ever ventured into configuring a theme using the WordPress site editor, you may have already come across the “Query Loop” block, which is nothing more than a list of posts. This block is interesting because it always brings the aesthetics that the developed theme proposed and can be extended by plugins in several ways. Thinking about the future, we are creating a resource that facilitates the use of this same block to show lists of Collections and Items from Tainacan: The Query Block Variations.
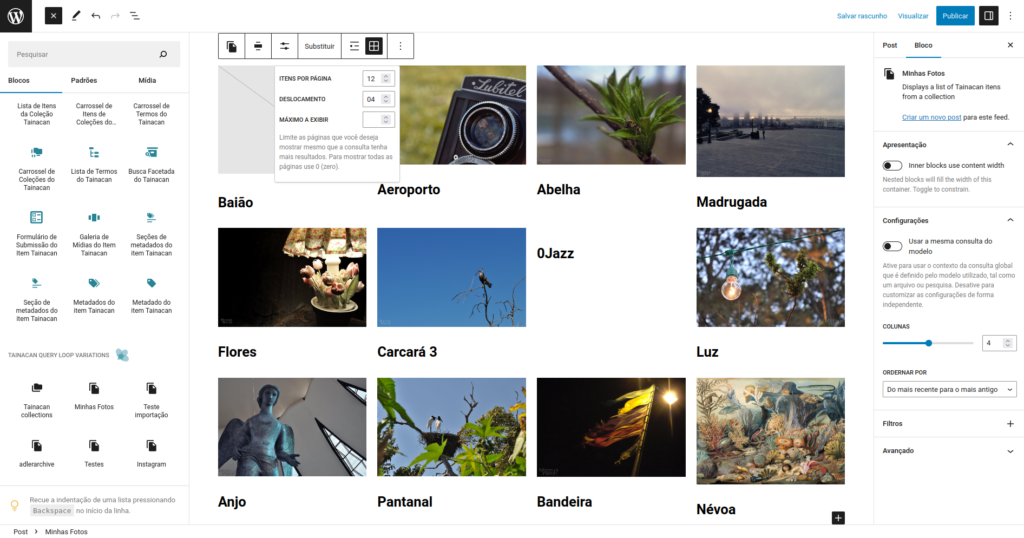
It was already possible to get to this by setting the “post type” in the block settings, but now we can skip a few steps and make Tainacan collections available directly from the block inserter panel. This turns out to be an alternative to our Item List block, one with fewer selection options but better integration with the theme and WordPress canonical options.
Improvements
- Option to sort Term or Repository level items list by Name in the Faceted Search Block;
- Option to not show the full term hierarchy in Taxonomy term links;
- Errors in the Item Submission block are shown more explicitly;
Bug fixes
- Switching tabs in admin was not resetting the list paging;
- Metadata name editing was not being reflected immediately in the metadata list at the repository level;
- Default sorting of collections was broken:
creation_dateinstead ofdate. - And many other bug fixes!
Themes
As a reminder, the features presented above to support Geolocation Metadata required some tweaking of the themes, so if you are using Tainacan Interface or Blocksy, be sure to download the latest version of them as well 😉
Get it now!
Tainacan version 0.20 is now available. You can download or update it directly from your WordPress dashboard: